Wondering how to install WordPress? This no-fluff guide provides clear steps from start to finish. Learn how to select a hosting provider, set up the necessary files, and navigate through the installation process with ease. Prepare to get your site up and running without any hassle.
By the end of this article, you should have installed WordPress running on your web server. Are you getting excited? So let’s get started and learn how to install WordPress.
Key Takeaways
When choosing hosting for WordPress, consider factors such as security, support, and performance, noting that popular choices include Siteground, Hostinger, and Cloudways, each with different features like one-click installations or manual setup options.
Installation preparation includes checking system requirements (ensuring PHP and MySQL versions are up to date), downloading WordPress, and setting up a database, whereas the installation process may vary from one-click through the host’s dashboard to manual installation for more control.
Post-installation configuration of your new website involves selecting themes and plugins to enhance aesthetics and functionality, as well as importing content and ensuring the correct settings are applied before going live while troubleshooting common issues may involve checking database connections and managing plugin-related errors.
Choosing Your Hosting for WordPress Installation
So, you’ve decided to install WordPress. That’s a great start! But before you can start designing your website, you need to choose a hosting provider. It’s like choosing the best plot of land to build your dream house. But how do you decide on the right one? There are a few factors to consider, such as:
- Security
- Customer reviews
- Level of support
- Overall performance
- Cost
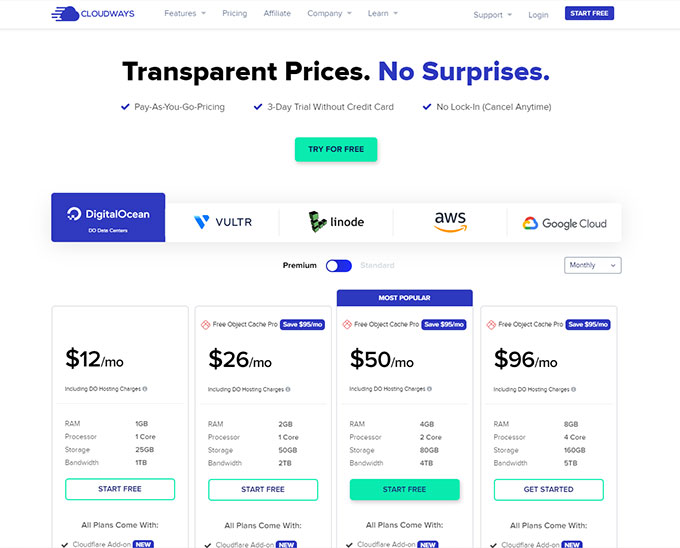
Three popular hosting companies that have proven their mettle in WordPress hosting are Siteground, Hostinger, and Cloudways. Each provider has its own strengths and weaknesses, and your choice will largely depend on your specific needs.
For instance, if you’re looking for top-tier performance, Cloudways leverages a cloud hosting platform and optimized web performance, making it the top performer in WordPress hosting. SiteGround, on the other hand, is known for its quality WordPress hosting, flexible pricing plans, and excellent uptime.
When it comes to Cloudways, they provide a number of advantages for WordPress hosting. These include:
- Daily backup and restore services
- No-cost SSL
- Fast Solid-state drives
- Managed WordPress hosting with free installation and automated transfer
- Helpful support staff with expertise in WordPress
These features can help improve your site’s visibility in search engines and overall user experience.
However, it’s also important to consider the potential drawbacks. For instance, Bluehost users may face resource limitations during high traffic and the need to upgrade to higher plans. There may also be challenges when working with PHP files during manual WordPress installation.
Preparing to install WordPress

Before learning how to install WordPress make sure that you have a web hosting account and registered domain name. Some hosting providers like Bluehost or Hostinger offer a free domain when you create an account. So it’s a great opportunity to save your money when starting a new business.
After choosing your hosting provider, prepare for the WordPress installation by checking system requirements, downloading the current version of WordPress, and establishing a database.
Begin by ensuring your system complies with the required setup for WordPress installation: PHP version 7.4 or above, MySQL version 5.7 or above OR MariaDB version 10.4 or above, and HTTPS support. These specifications are mandatory for WordPress installation on any hosting platform.
How to install WordPress on your web hosting account
With the preparation complete, you are ready to install WordPress on your web server. Depending on your hosting provider’s facilities, you can resort to one-click installation or manual installation. Let’s explore these methods in more detail.
The one-click installation offers a swift and handy method for those who want to install WordPress. Many hosting providers feature auto-installers, enabling WordPress installation directly from your hosting dashboard in a single click.
This user-friendly, time-efficient method allows you to begin website customization right after the WordPress install by simply clicking the install WordPress button.
Conversely, manual installation gives you more control over the setup, which can be advantageous for customization. This involves:
- Downloading the latest WordPress package from wordpress.org
- Unzipping the file
- Uploading the unzipped file to the public_html directory
- Configuring the wp-config.php with your database details
- Initiating the installation process
Note that manual installation requires creating a database user and linking it to the database. If you don’t have any technical knowledge we don’t recommend a manual installation method.
To learn how to install WordPress using auto installer we prepared a detailed guide. It’s a very simple process compared to manual installation.
How to install WordPress with one-click installation using Cloudways
One-click installation is favored by beginners due to its ease and convenience. A single click can get your WordPress site up and running in just a few minutes. But what’s the process?
The one-click installation process employs a web application installer provided by your hosting service. This tool simplifies the process by bypassing the manual steps typically needed for WordPress setup.
For example, with Cloudways, you can access the WordPress installation wizard within their platform and commence the installation by following a very simple process. The system thereafter automates the setup process.
So, let’s see how to install WordPress on Cloudways in just a few simple steps.
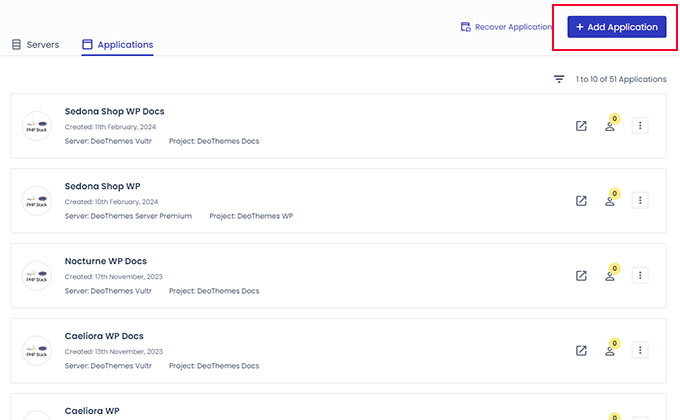
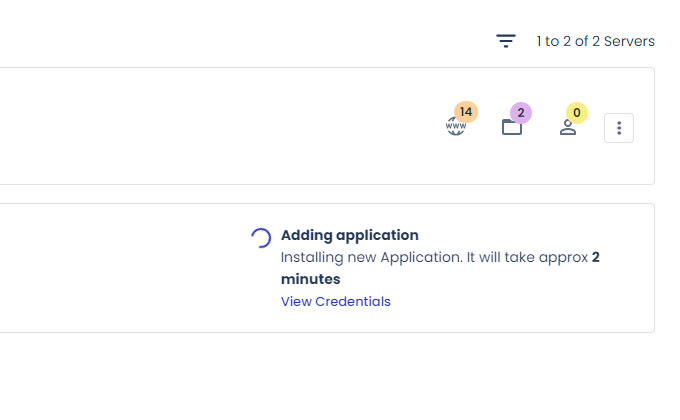
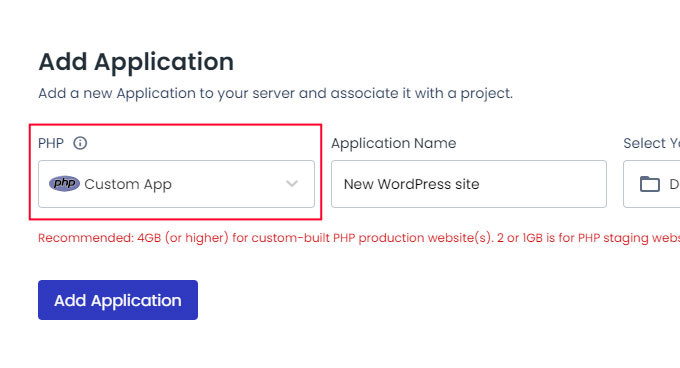
Sign in into your hosting account dashboard and click Add Application. You will be offered to select a server in case you have multiple servers.
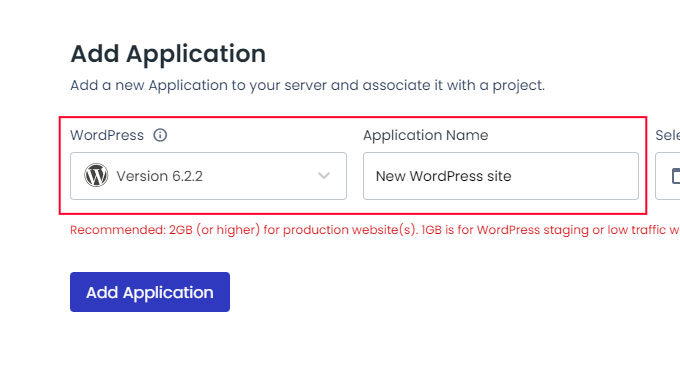
From the Select Application dropdown menu select WordPress. Give your new application a name and click Add Application.
- Wait until the process of installation is completed.
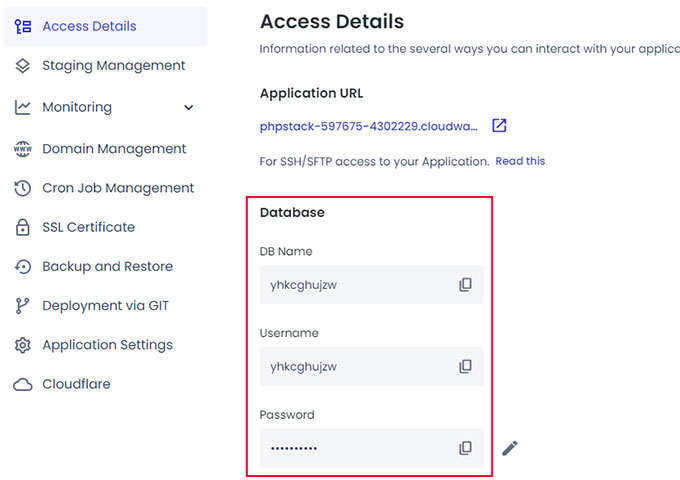
Click on your new WordPress application to open it and login to your WordPress admin using login details provided by the hosting.
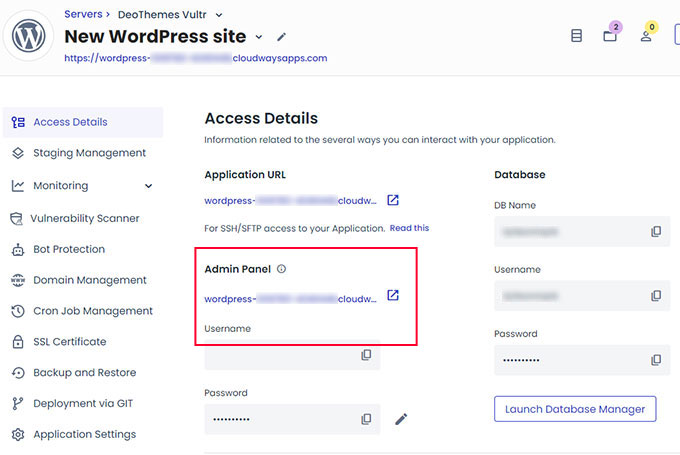
Congratulations! You have just installed WordPress in less than 5 minutes.
How to install WordPress locally on your computer

Installing WordPress locally on your computer is another great way to set up your WordPress site. This method allows you to:
- Test and develop your site offline
- Ensure privacy
- Have faster file manipulation
- Create a secure environment for testing without impacting a live site.
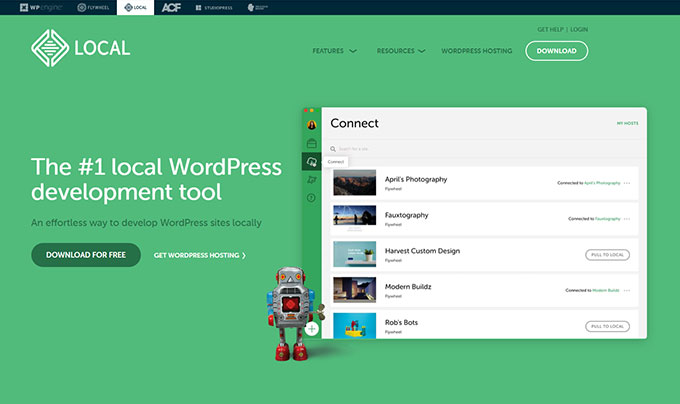
Windows users can install WordPress locally using Local. It’s an easy and free to use application that allows you to run WordPress locally. The steps include:
- Downloading and installing the Local software
- Creating a new application
- Configuring WordPress
- Initiating the installation process.
Mac users can install WordPress locally using MAMP. This entails installing MAMP, setting up its basic configurations, launching the servers and creating a database, and then downloading and installing WordPress. Alternatively Local works on Mac machines as well.
Installing WordPress locally can optimize your development processes by minimizing dependence on an internet connection.
This flexibility allows you to work on your WordPress site at your convenience. Once satisfied with your site, migrating it to your web server is straightforward.
The good news is that you can migrate your local WordPress files to your web server afterward.
How to install WordPress manually via FTP
So far we’ve discussed how to install WordPress using hosting one-click auto installer and how to install WordPress locally. Next, we will learn how to install wordpress manually via FTP which is another popular option.
For those who prefer to have more control over the installation process, manual installation of WordPress via FTP is the way to go.
This method involves uploading files to your web server, creating a database, and configuring the wp-config.php file.
First you will need to download the latest WordPress version. Unzip the archive and inside you will find WordPress folder will all the important files. You will upload these files to your web server later.
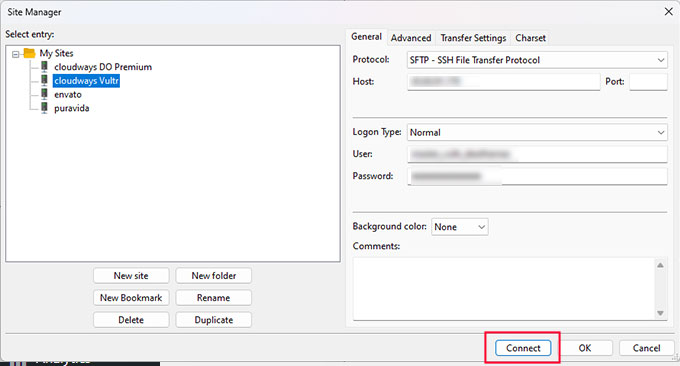
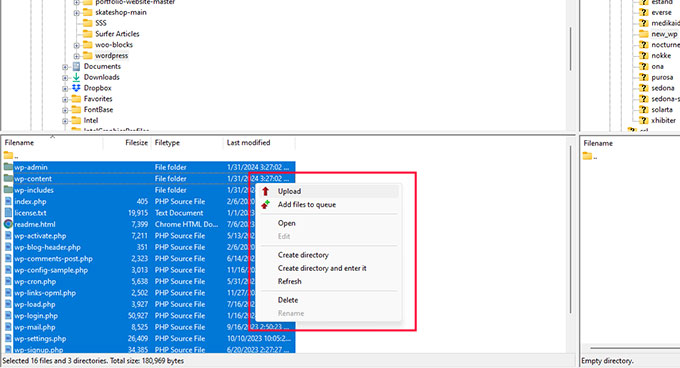
Begin by uploading the WordPress files to your web server using an FTP client like FileZilla. Follow these steps:
Connect to your web server with the given FTP credentials.
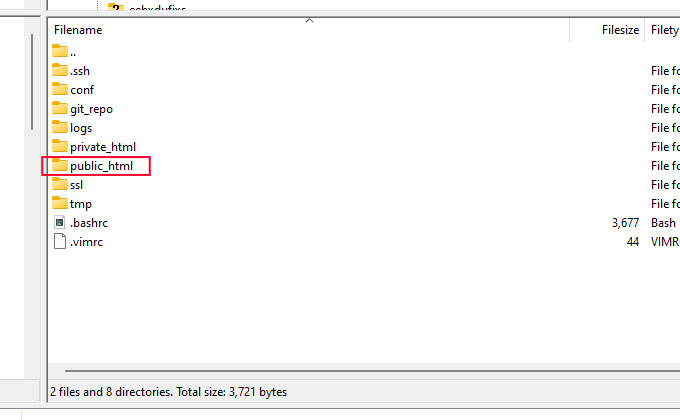
Find the WordPress website folder on the remote site, it is usually called public_html directory. If you wish to install WordPress into a subfolder (example: yoursite.com/blog) then create another folder (blog) inside of the public_html directory.
- Select all the files and click Upload to upload the WordPress files to your web server. Alternatively, you can unzip the archive using the unzipper PHP script.
Next, create a database for your new website. Here are the steps to follow:
- Access your web server’s control panel.
- Create a new empty database. With Cloudways you can simply create a new PHP application that will contain an empty database.
Remember to record the database credentials, which will be needed to configure WordPress during the next steps.
Finally, configure the wp-config.php file. Follow these steps:
- Rename the wp-config-sample.php file to wp-config.php.
- Edit the wp-config.php file and enter the correct database details, like database name, user, and password from the earlier steps.

After editing, save and close the file.
If everything is done correctly you are now ready to proceed to the next step. Open a new browser window and enter your domain to start a WordPress setup process.
If you uploaded WordPress into the domain’s root folder navigate to:
https://yoursite.com/wp-admin/install.php
If you installed WordPress into a subfolder your path should look something like this:
https://yoursite.com/subfolder/wp-admin/install.php
Make sure to replace yoursite.com with your actual domain name.
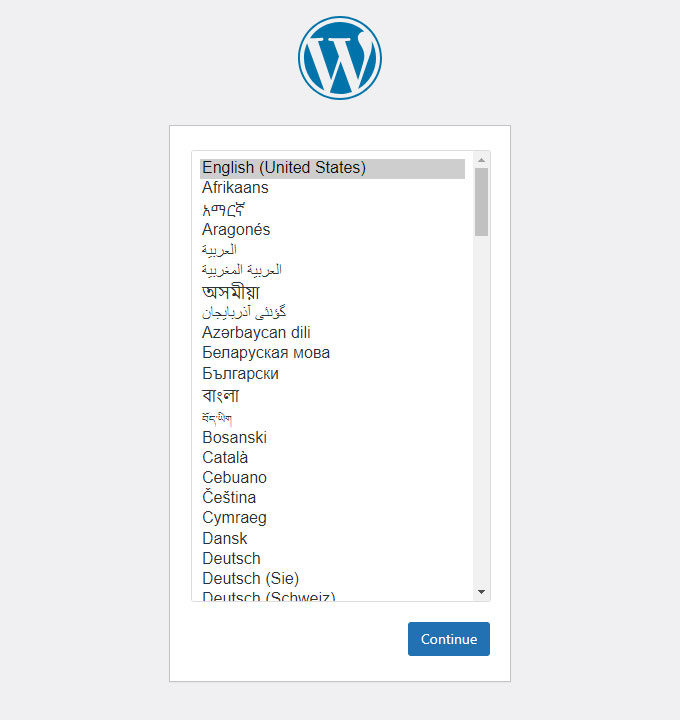
Once you navigate to a correct URL you will be redirected to the WordPress setup page. From here select the preferred language and click Continue.
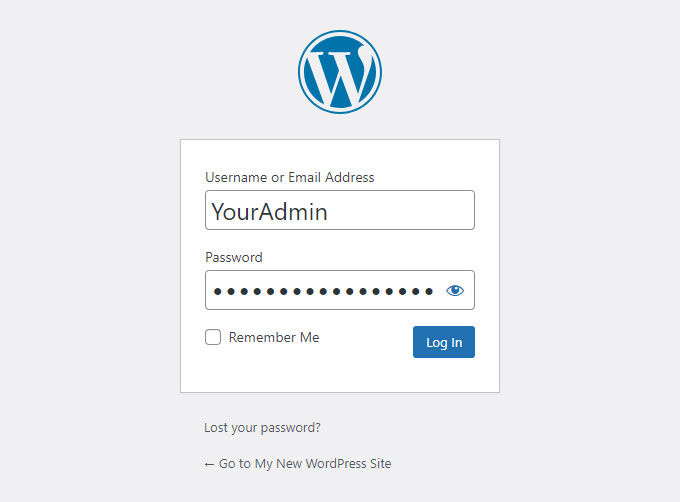
You will see the WordPress welcome page. On this page, it is important to fill all the fields correctly. Enter your site title, username and password, and your email.
The site title can be updated later on. When choosing username and password make sure to avoid oversimplified usernames and passwords like admin and hello12345 since it can cause a big security risk for your site.
WordPress will automatically generate a strong and safe password. Don’t forget to save it.

Additionally, if you don’t want your website to be indexed by search engines, check the Search engine visibility checkbox. Otherwise, leave it unchecked.
Once all the fields are filled up click the Install WordPress button. You should be redirected to the last screen and see a success message WordPress has been installed. Thank you, and enjoy. This indicates a successful installation.
You can now login to your WordPress admin using your login credentials.
Although the manual WordPress installation looks complicated it is one of the methods of how to install WordPress. It is rarely needed nowadays since hosting companies offering a simple one-click WordPress installations.
Configuring Your WordPress Site
After installing WordPress, configure your site by selecting a theme, installing plugins, and customizing the appearance and functionality of your site. Additionally, take some steps to secure and speed up your WordPress site.
Let’s explore each of these aspects in depth.
Picking the right WordPress theme
The theme you select for your WordPress site profoundly influences the site’s performance and user experience. A well-optimized theme can enhance loading speed and SEO performance, while a feature-heavy theme might slow down your site.
With so many WordPress themes available on the market, each offering unique designs and features it can be very confusing for beginners to choose the right theme.
To make it easier we composed a few lists of the best WordPress themes that can help you to choose the perfect WordPress theme for your new site.
- Fastest WordPress themes
- Best free WordPress themes for bloggers
- Best WordPress block themes for Full site editing
- Best free minimalist WordPress themes
- Best WooCommerce themes
Some themes are multipurpose, and suitable for creating nearly any type of website, while others are industry-specific, tailored to cater to particular niches.
Here are some examples:
- Ona: ideal for blogging, personal, or magazine websites
- Nokke: portfolio and services WordPress Theme, perfect for digital agencies and freelancers
- Arendelle: best theme for eCommerce websites powered by WooCommerce
- Margin: marketing SEO WordPress theme based on Elementor page builder
After selecting a theme, install it by following these steps:
- Navigate to the Appearance » Themes page in your WordPress dashboard.
- Click the Add New button.
- Click the upload button to start uploading the theme file from your machine.
If you ever got stuck you can follow our guide on how to install a WordPress theme.
Choosing and installing WordPress plugins
Plugins, similar to smartphone apps, form another essential component of configuring your WordPress site. They enhance your site with extra features and functionality. Some common examples of plugins include:
- Contact Form 7: Adds a contact form to your site
- RankMath SEO: Helps optimize your site for search engines
- Elementor: The most popular page builder
- WooCommerce: Creates an online shop on your site
Be it adding a contact form, enhancing SEO, or creating an online shop, you can find a plugin to do the job.
To install WordPress plugins, you have two options. Firstly, for free plugins, you can browse the official WordPress plugin directory at wordpress.org and search for the desired plugin.
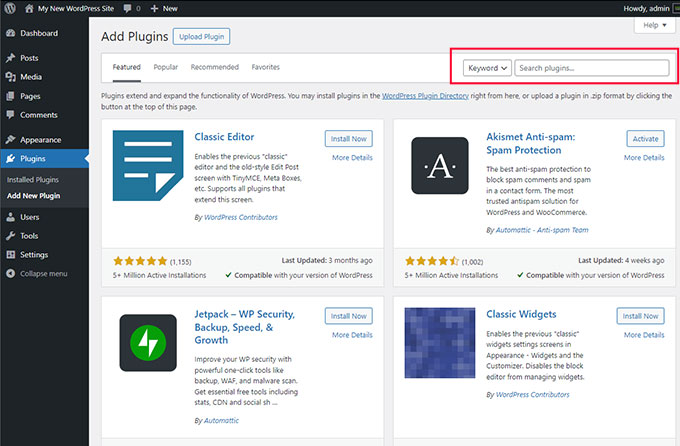
From your WordPress dashboard go to Plugins » Add New Plugin and use the search bar in the top right corner.
Once you find the desired plugin, simply click on the Install Now button, and WordPress will automatically download and install the plugin for you.
Secondly, for premium plugins from third-party websites, you’ll need to purchase the plugin and download it as a zip file.
Then, in your WordPress dashboard, go to the Plugins section, click on Add New Plugin, and click the Upload Plugin button. Select the downloaded zip file and click Install Now to complete the installation process. After installation, activate the plugin on your website by clicking Activate button.
Migrating Content and Going Live
With your WordPress site set up, it’s time to bring in your content and launch. This step includes transferring your local site to your web server and making sure all settings are configured correctly.
The easy way to achieve it is by using the All-in-One WP Migration plugin. Moving a WordPress website from a local server to a web server requires the following steps:
- Install All-in-One WP Migration plugin
- Create a local package
- Upload package files to the web server
- Run the installation script on your web host
It’s crucial to check your live site’s functionality after these steps are completed.
The import process duration can vary from several minutes to hours, depending on the content size and server capacity.
Prior to launching your WordPress site, ensure your settings are correct. Go to the General Settings page to update the site title, tagline, timezone, and other pertinent details.
Also, check Settings > Reading to configure the necessary functionalities. This guarantees your live website displays the right information and functions correctly.
Troubleshooting Common WordPress Installation Issues
Though WordPress installation is typically a seamless process, you might face some issues. These could include internal server errors, corrupted .htaccess files, and parse/syntax errors. However, most of these issues can be resolved effortlessly.
A common issue is the error establishing a database connection. This can be resolved by verifying the accuracy of your database login credentials and your WordPress database credentials.
Another frequent issue is the white screen of death. This can be solved by:
- Deactivating all WordPress plugins
- Clearing the WordPress cache
- Tracking any recent changes
- Switching to a default theme
- Clearing your browser’s cache of your site
The failed to write php file to disk error can be addressed by checking your file permissions, contemplating adding more disk space, and checking if your website has exceeded its space allowance.
Summary
In conclusion, installing WordPress, whether on a web host or locally on your computer, can be a straightforward process when you understand the steps involved.
From choosing a hosting provider to configuring your WordPress site with the right theme and plugins, each step plays a crucial role in creating a successful website.
While you may encounter some issues along the way, most can be resolved easily, ensuring a smooth installation process. So go ahead, take the leap and start building your dream website with WordPress today!
Frequently Asked Questions
How do I install WordPress on my computer?
To install WordPress on your computer, you can follow these general steps: download the latest version from wordpress.org, upload the files to your server, create a MySQL database and user, configure the wp-config.php file, and run the WordPress installation process.
You can also consider using a local server environment like WAMP, XAMPP, or MAMP to set up a testing site on your computer without affecting your live website.
Can I install WordPress for free?
Yes, you can install WordPress for free on your website, whether it’s hosted on shared, VPS, or dedicated servers. It’s an open-source project, and downloading it is completely free.
However, make sure to understand the difference between wordpress.com vs wordpress.org.
What are the system requirements for installing WordPress?
To install WordPress, make sure your system has PHP version 7.4 or higher, MySQL version 5.7 or higher, or MariaDB version 10.4 or higher, along with support for HTTPS. These requirements are essential for a successful installation.
How do I install a WordPress theme?
To install a WordPress theme, go to Appearance » Themes in your WordPress dashboard, click Add New, and then upload the theme file from your computer. You can also check the detailed guide on how to install a WordPress theme.
How do I install a WordPress plugin?
To install a WordPress plugin, first download the plugin file from the source, then go to the Plugins » Add New page in your WordPress dashboard, click on the Upload Plugin button, select the downloaded file, and click Install Now. Finally, click on Activate Plugin.