Are you looking for a way to customize WordPress themes? In this article, we will explore how we can customize WordPress website. Let me show you some easy WordPress customization techniques for the editing of a theme as well as some advanced tricks.
In today’s digital landscape, having a unique and customized website is essential for standing out from the crowd. Fortunately, WordPress offers a wide range of customization options that allow you to tailor your website according to your preferences.
In this blog post, we will explore three easy ways and four advanced methods to customize WordPress themes. Whether you’re a beginner or an experienced user, these techniques will help you create a website that truly reflects your vision.
Why Should I Customize My WordPress Theme?
Customizing your WordPress theme is crucial for establishing a strong online presence. It allows you to showcase your individuality, enhance user experience, and align your website with your brand identity.
By personalizing your WordPress theme, you can create a website that stands out, captivates your audience, and helps you achieve your online goals.
How do you customize WordPress themes?
When it comes to WordPress themes there are several options available at your disposal. Some popular options are WordPress Customizer, Full Site Editor, child theme, page builders, and custom CSS.
We’ll try to cover all of these, however, some of the techniques require additional technical knowledge and understanding of how WordPress works under the hood.
Are you excited yet? Let’s get started.
Easy Ways to Customize a WordPress Theme
1. WordPress theme customization using WordPress Customizer
The WordPress Theme Customizer provides a user-friendly interface for modifying various aspects of your theme without any coding knowledge. It allows you to customize elements such as colors, fonts, layouts, and more.
When it comes to customizing your WordPress theme, WordPress Customizer is the most popular option among classic themes.
With its intuitive controls, beginners can easily make visual changes and preview them in real-time.
In this example, we’ll use the WordPress theme Nokke which comes with advanced customization options. Follow these steps to customize your WordPress theme using the WordPress Customizer:
- Access the WordPress Customizer by navigating to Appearance in your WordPress dashboard and selecting Customize.
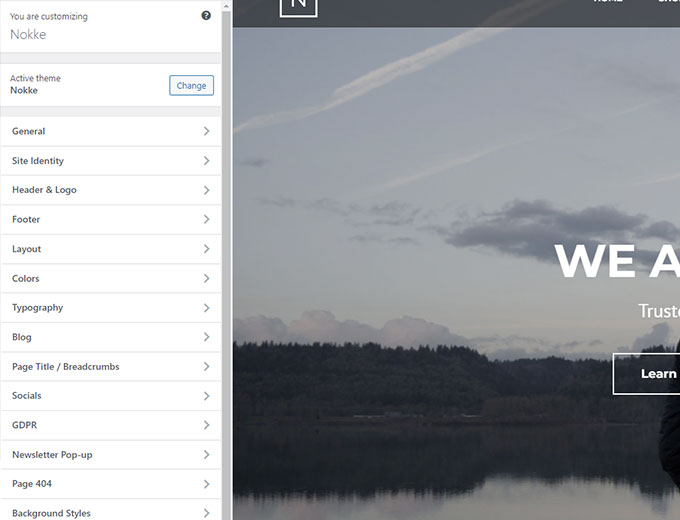
- Familiarize yourself with the available options in the WordPress Customizer, such as site title, homepage settings, colors, typography, and layout.
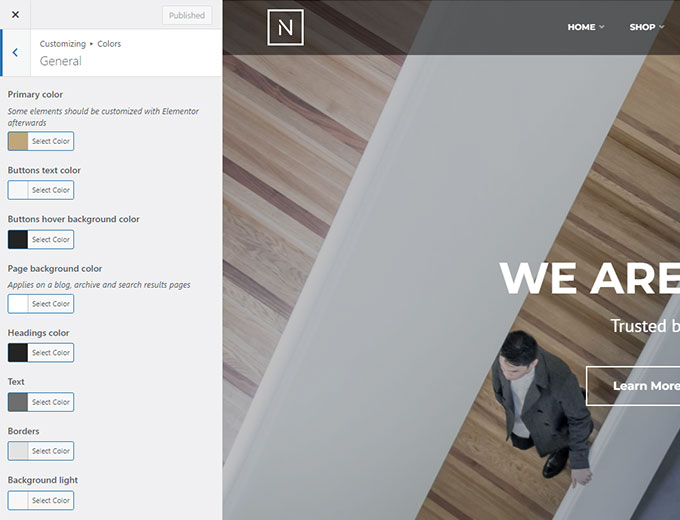
- Make changes to these options according to your preferences and preview them live.
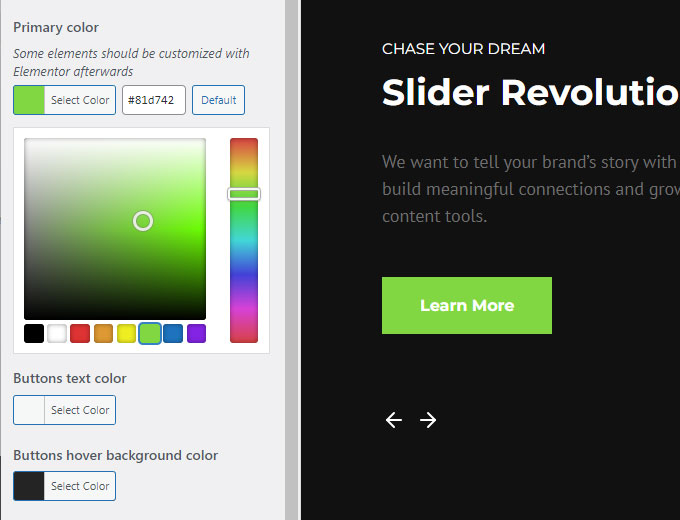
- Once you’re satisfied with the modifications, click Publish to apply the changes to your website.

2. How to customize WordPress theme with Full Site Editing
Full Site Editor is a new and advanced way to customize your website. It’s a revolutionary feature available in certain WordPress themes, such as the Ona theme.
It enables you to customize every aspect of your website, including headers, footers, sidebars, and more. Follow these steps to customize your WordPress theme using Full Site Editor:
- Select a WordPress theme that supports Full Site Editing, such as the Ona theme.

- Install and activate the theme on your WordPress website.
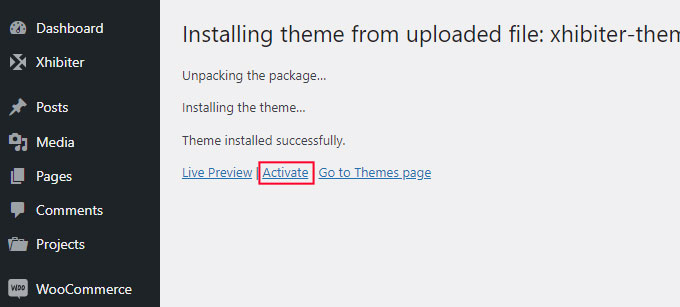
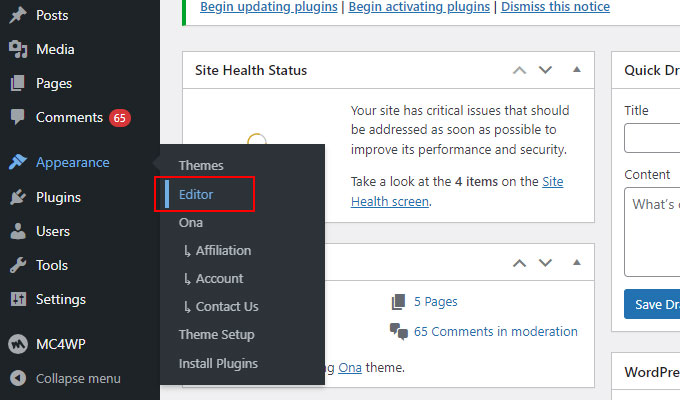
- Access the Full Site Editor options by navigating to Appearance in your WordPress dashboard and selecting Editor.
- The Full Site Editor allows you to customize every component of your entire website using drag and drop interface. Explore the available customization settings and make changes according to your preferences.
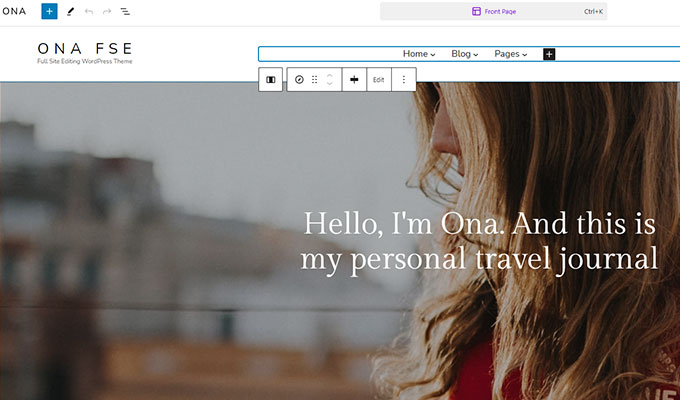
- Preview the modifications and save them once you’re satisfied with the results.

3. Customize your WordPress theme using a page builder
Page builder plugins provide a drag-and-drop interface that simplifies the process of customizing your WordPress theme.
These plugins offer a wide range of pre-designed elements, templates, and layouts, allowing you to create visually stunning pages without any coding skills.
Some popular page builder plugins include Elementor, WP Bakery, Divi, and Beaver Builder. If you are looking for a great collection of Elementor themes, look no further as we offer one of the finest themes optimized for the Elementor page builder plugin.
Follow these steps to customize your theme using a page builder plugin:
- Install and activate a page builder plugin of your choice from the WordPress repository.
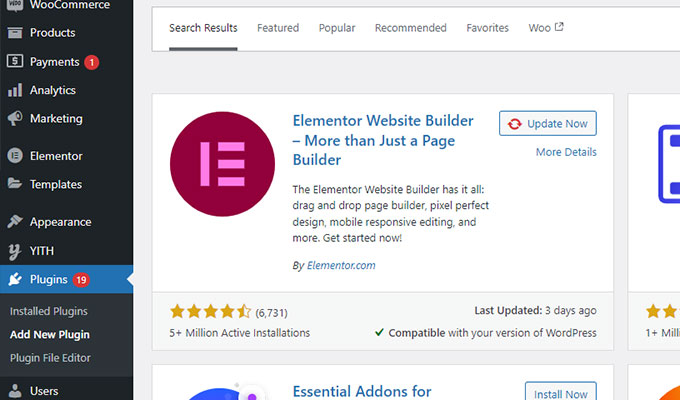
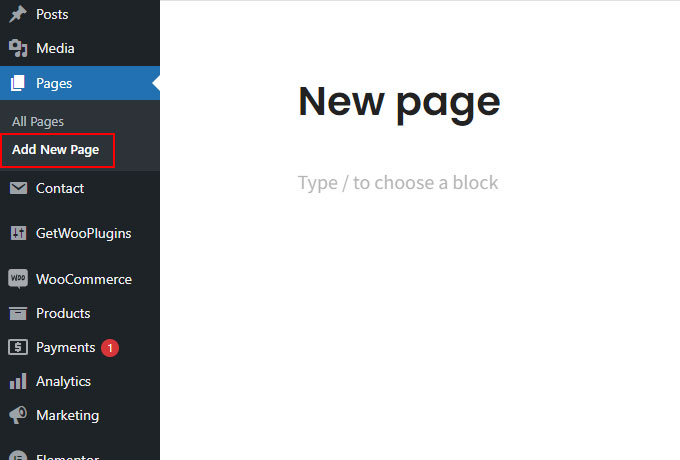
- Create a new page or edit an existing one.
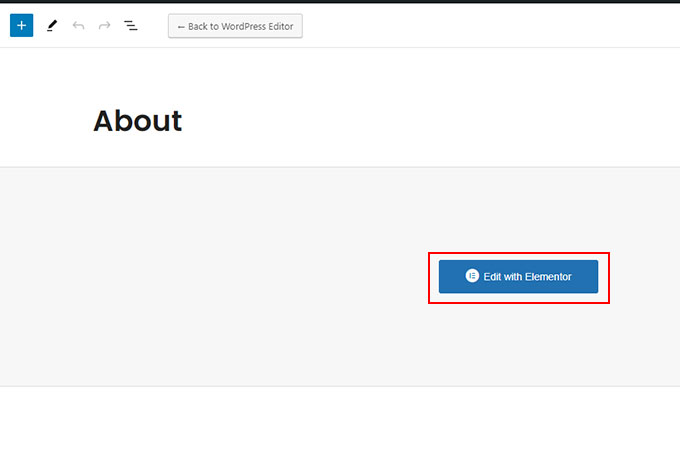
- Launch the page builder interface and start adding elements to your page. With Elementor click on Edit With Elementor button
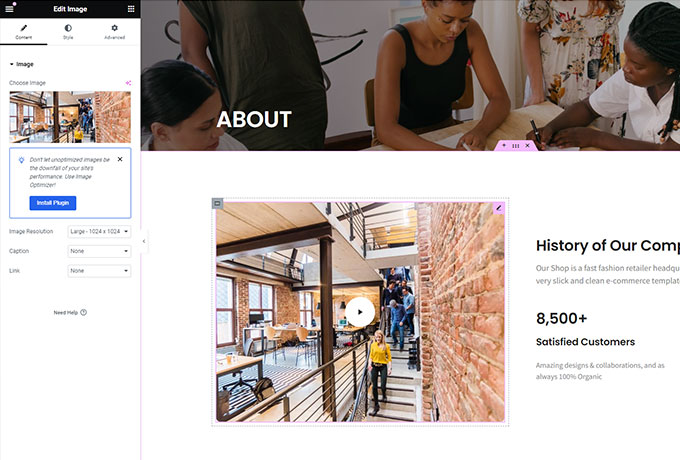
- Drag and drop widgets, customize the elements, adjust the layout, and add content according to your requirements. Preview the changes and update the page once you’re satisfied.
Advanced Ways to Customize a WordPress Theme
1. Customize a WordPress theme files from WordPress dashboard
This method is not recommended for beginners as it requires some level of proficiency in PHP, JavaScript, and CSS. Remember it is always recommended to use a child theme instead.
Please note that when using this option the theme update will erase all the changes that you’ve made. So I only recommend this method if you know what you’re doing.
This method can be useful if you are building a custom WordPress theme and want to test something quickly,
Navigate to Appearance -> Theme File Editor and you’ll first be presented with the popup to confirm your actions. Click on the I understand button.
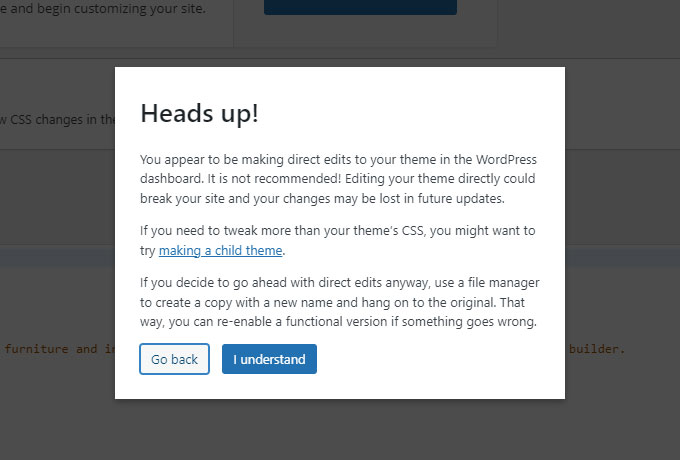
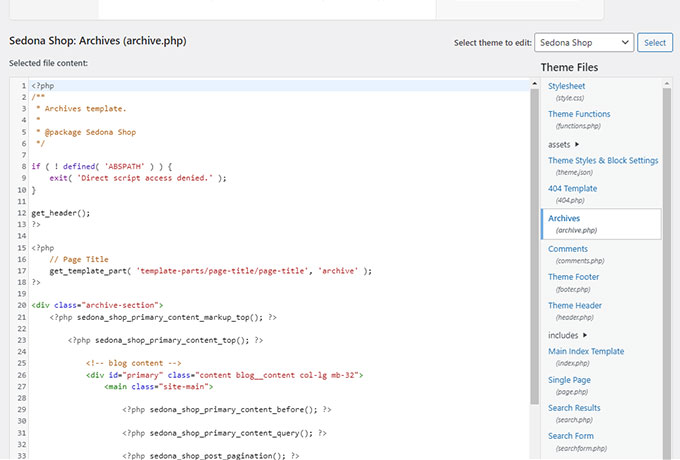
You will see the list of theme files on the right and the code editor on the left. If you have multiple themes installed you can select which theme to edit from the dropdown menu.
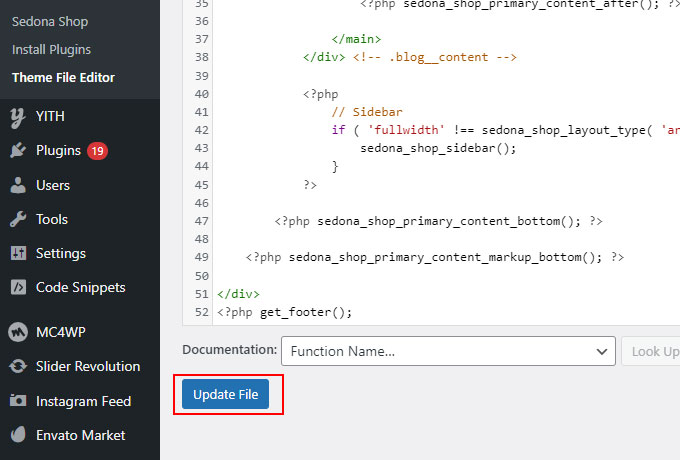
Once you’ve done with editing click Update File button to save the changes.
2. How to customize your WordPress theme using child theme
To customize your WordPress site using a child theme, first, you will need an installable child theme. Using a child theme is a more advanced method of customizing WordPress themes.
It allows you to make modifications to your theme without affecting the original parent theme files. This is particularly useful when you want to make extensive changes or add custom functionality using WordPress theme code.
Child theme inherits all the functionality and styles from the parent theme and allows you to extend it.
Most WordPress themes offer child themes that you can find in a downloadable archive. Astra theme offers a child theme generator that can help you generate your child theme files. Alternatively, you can use child theme wizard plugin.
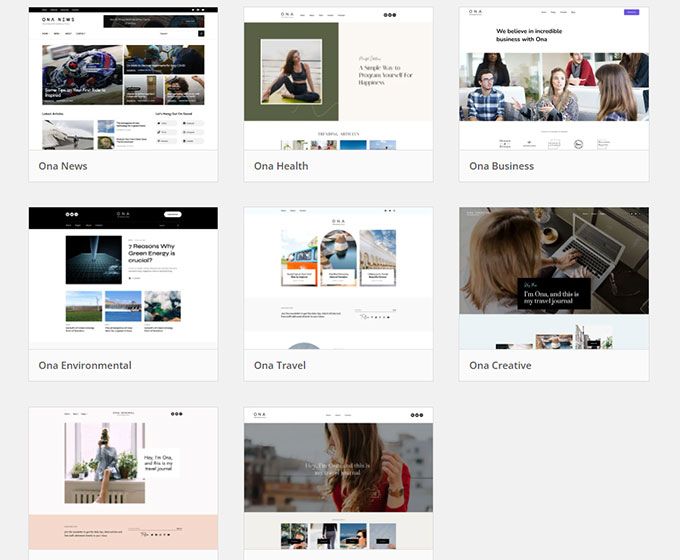
Some themes like Ona offer child themes listed on wordpress.org. Ona comes with 8 free child themes that you can install free of charge. Additionally, the premium theme offers 14 child themes.
3. How to customize your WordPress theme using hooks (actions and filters)
Hooks, also known as actions and filters, are a powerful way to customize your WordPress theme without directly editing code.
Hooks allow you to add or modify functionality at specific points in the code, giving you more control over how your WordPress site looks and functions.
The best place to add hooks is inside the child theme. However, you can also use a plugin to achieve the same result with the parent theme. Follow these steps to customize your theme using hooks:
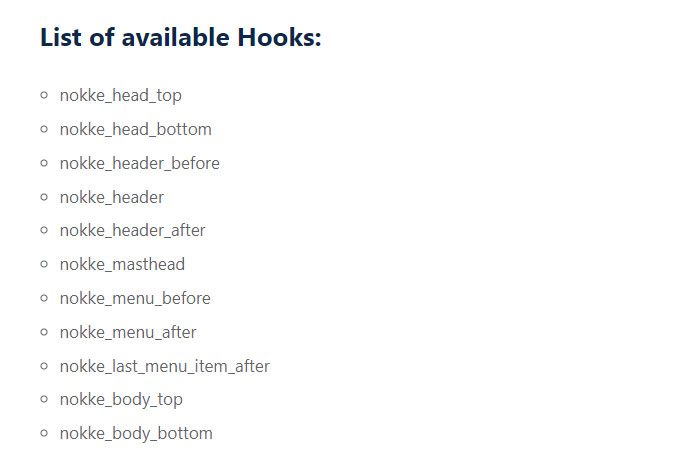
- Identify the action or filter hook that corresponds to the element you want to modify. Most popular WordPress themes provide a list of action hooks used throughout the code. For example, the Nokke WordPress theme provides a list of hooks listed in the documentation.
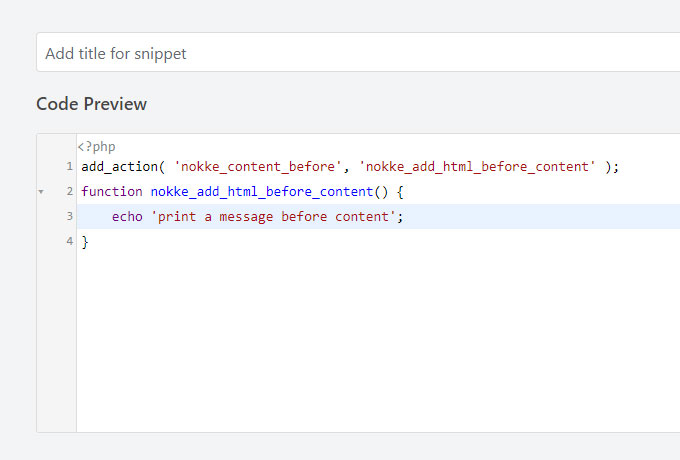
- Write a function that will be executed when the hook is called. Add your custom code within the function to achieve your desired modification. Use the add_action() or add_filter() functions to attach your custom function to the hook.
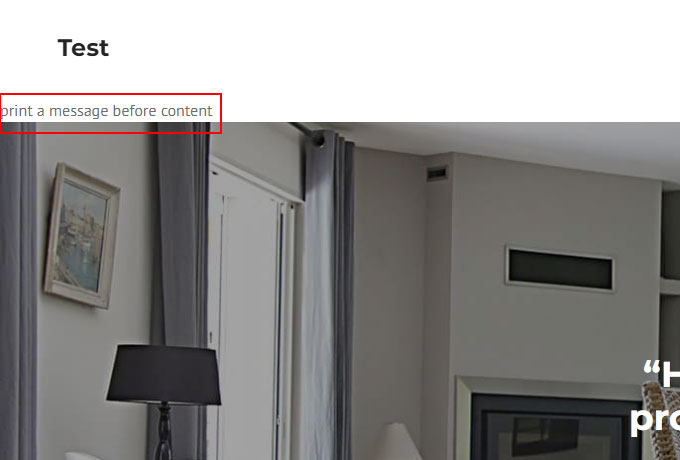
- Save your changes and preview them on your website.
4. How to customize your WordPress theme using custom CSS
Custom CSS allows you to modify the styles of your WordPress theme by adding your own code snippets. This method gives you greater control over the appearance of your website.
However, this method is not always necessary and should be used only if no other options are available.
Custom CSS in WordPress Customizer provides a simple yet powerful way to bring about unique aesthetic changes to your website. This feature allows you to add your own CSS code and instantly preview how these changes affect your website.
This method is particularly useful if you want to make minor tweaks that are not available in the theme settings or if you prefer hands-on control over the aesthetics of your site. Here’s how you can use the Custom CSS feature in the Customizer:
- Navigate to the WordPress dashboard and select Appearance -> Customize.
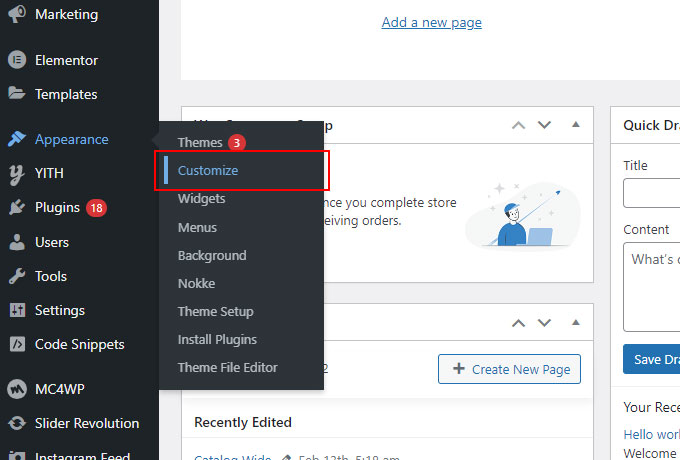
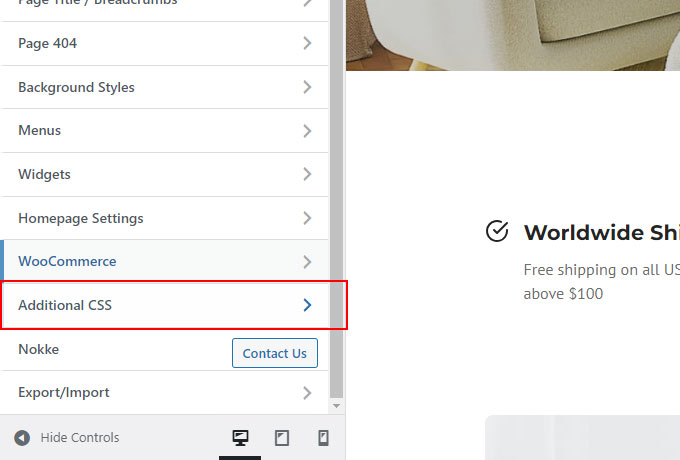
- You will find an array of options on the left side of the screen. Navigate to Additional CSS.
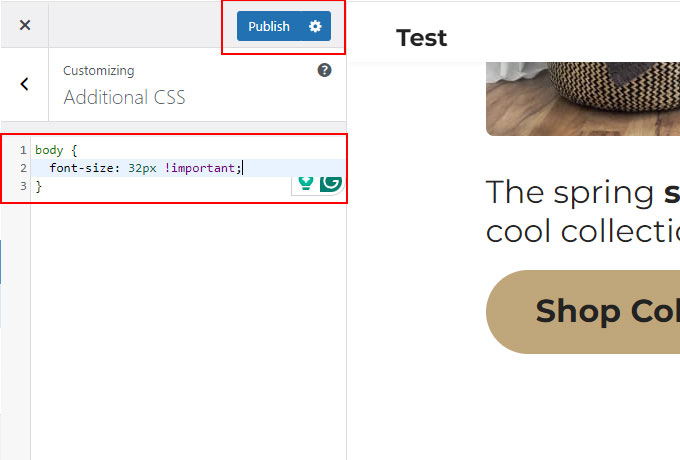
- Here, you can input your custom CSS code. As you type, you’ll see a live preview of the changes on the right side. Sometimes theme or plugin CSS styles will be stronger than your CSS, so try adding the !important; at the end of the line. Once you’ve made the desired changes, simply click Publish to make them live.
Best practices for customizing a WordPress theme
When customizing a WordPress theme, it is important to follow some best practices to ensure that your modifications are effective and easily maintainable. Here are some tips to keep in mind:
- Use child themes whenever possible instead of directly editing the parent theme.
- Before making any changes, create a backup of your website in case something goes wrong.
- Follow a logical and organized structure when editing code to make it easier to find and update specific elements.
- Use hooks (actions and filters) instead of directly editing code whenever possible.
- Make sure your modifications do not conflict with the theme’s overall design or functionality.
- Regularly test your website after making changes to ensure everything is working as intended.
Always make a backup before editing
Before making any changes to your WordPress theme, it is always a good idea to create a backup of your website. This will ensure that you have a saved version in case something goes wrong during the customization process.
To make a backup, you can use a plugin or manually export your website’s files and database. If possible, it is recommended to use a staging environment to make changes and test them before implementing them on your live website.
Make changes on local or staging website
Before implementing any changes on your live website, it is advisable to make them on a local or staging website. This will allow you to test your modifications and ensure that they work as intended before making them live.
You can use tools like Local by Flywheel or MAMP to create a local development environment for your WordPress website. Additionally, many web hosting companies offer staging options for testing changes before deploying them to the live website.
Avoid coding whenever possible
Unless you have experience with coding, it is best to avoid making changes to your theme’s code.
This can be risky and may cause issues with your website if not done correctly. Instead, try using plugins or the theme’s customization options to achieve your desired results.
Full site editing themes like Ona allow you to customize the appearance of your site without touching a single line of code.
There are many free and paid plugins available that can help you customize your website without having to write any code.
These include page builders, image editors, and more. Take advantage of these tools to make changes without risking damaging your website’s code.
Use child themes instead of editing parent theme
When making customizations to your WordPress theme, it is recommended to use a child theme instead of directly editing the parent theme. This will prevent any changes from being overwritten when you update your parent theme.
Creating a child theme is relatively simple and can be done by following the instructions on WordPress Codex or using a plugin like Child Theme Wizard.
Once your child theme is activated, any modifications made to its files will not be affected by updates to the parent theme. This ensures that your website remains functional and consistent even after theme updates.
Follow the Accessibility standards
When making changes to your website’s mobile responsiveness, it is important to also consider accessibility standards. This ensures that your website can be accessed and used by individuals with disabilities.
WordPress has a built-in Accessibility Mode that can be enabled in the Screen Options when editing pages or posts. Additionally, there are plugins available to help improve the accessibility of your website.
Remember to test your changes and make sure they comply with the Web Content Accessibility Guidelines (WCAG).
Additionally, check the WordPress accessibility coding standards article that goes into detail about accessibility.
Focus on responsive theme design
Choosing a responsive theme is crucial for ensuring your website’s mobile responsiveness. Make sure to select a theme that is specifically labeled as “responsive” or has multiple layout options for different devices.
Also, pay attention to the design and layout of the theme. Avoid overly complicated designs and stick to a clean, simple layout that will be easier to navigate on smaller screens.
Use media queries for responsive design. Media queries are a powerful tool that allows you to create responsive designs for your WordPress website.
By using CSS, you can specify different styles for different screen sizes, ensuring that your website looks great on all devices.
When designing for mobile, it is important to prioritize your content. This means making sure that the most important information is visible and easily accessible on smaller screens.
You can also use responsive design techniques like hiding certain elements or using collapsible menus to create a more streamlined experience for mobile users. However, don’t sacrifice good design for responsiveness
Follow WordPress coding standards
Remember to follow the WordPress coding standards. Badly written code can lead to a website being hacked, so make sure that you know what you’re doing or hire an experienced developer when in doubt.
Some key standards to keep in mind include using correct indentation, commenting your code for better readability, and using proper naming conventions. You can also use plugins like Code Snippets or WP Code Editor to help you adhere to these standards.
Test and optimize for different devices. After making changes to improve your website’s mobile responsiveness, it is important to test how it looks on various devices. Use tools like Google’s Mobile-Friendly Test or BrowserStack to see how your website appears on different screens.
Use Version control
Version control is an essential tool for maintaining a responsive WordPress website. It allows you to track changes made to your code and revert back if needed.
Git is a popular version control system that can be easily integrated with WordPress using plugins like Gitium or WP Rollback. This will ensure that any changes made to your website’s responsiveness are recorded and can be managed efficiently.
The WP Rollback plugin is a powerful tool that allows you to revert WordPress plugins and themes to previous versions. This feature can be significantly useful when dealing with compatibility issues or unexpected results after an update. Here is a step-by-step guide on how to use it:
- Install and Activate the Plugin: Navigate to your WordPress dashboard, click on Plugins, select Add New, and search for WP Rollback. Click Install Now followed by Activate once the installation is complete.
- Rollback a Plugin or Theme: From your dashboard, navigate to the Plugins or Themes section, depending on what you want to rollback. Locate the plugin or theme in question, and you’ll see a new Rollback option. Click on it.
- Choose the Version to Rollback To: WP Rollback will show you a list of available versions for the plugin or theme. Pick the one you want and click Rollback.
- Confirm and Execute Rollback: A warning message will appear, highlighting the risks of reverting to an old version. If you’ve backed up your site and want to proceed, click Rollback.
Summary
Customizing your WordPress theme is a powerful way to transform your website and make it truly yours.
In this article, we explored various methods of theme customization, here is how you can customize WordPress themes:
- Using WordPress Customizer
- Using Full Site Editor
- Using a Page Builder plugin
- Using the theme files editor in the dashboard
- Using child theme
- Using theme hooks (actions and filters)
- Using custom CSS
Whether you’re a beginner or an advanced user, these three easy ways and four advanced methods provide a range of options to tailor your WordPress theme to your liking.
Experiment with different techniques, explore the customization options available and create a website that perfectly represents your vision. Remember, finding the right balance between simplicity and advanced customization is key. Happy customizing!
Frequently Asked Questions
How do I change my WordPress theme without losing content?
Changing your WordPress theme without losing content can be accomplished through careful steps. First, backup your site.
This is a necessary precaution to restore your site if anything goes wrong. Then, go to Appearance -> Themes on your WordPress dashboard. Click Add New and choose your new theme.
Install and activate it. Your content should remain intact as it’s stored in your WordPress database, independent of the theme. Do note, however, that while your content remains, the appearance and layout might change based on the new theme’s settings.
You may need to reconfigure widgets and menus to suit your new theme. Always preview your new theme before activation to ensure it meets your needs and perform thorough checks after activation to confirm all content displays correctly.
How to edit WordPress Theme without Coding?
Editing a WordPress theme without coding can be done using the built-in customization options in the WordPress dashboard. These options may vary depending on your chosen theme, but generally, you can customize things like the logo, colors, fonts, and layout.
To start customizing your theme, go to Appearance -> Customize on your dashboard. This will open up the theme customizer where you can make changes and see them reflected in real-time.
Some themes also have a Theme Options or Settings section within the dashboard, which can provide further customization options.
If you don’t want to rely solely on built-in options, there are also many WordPress plugins available that offer drag-and-drop interfaces for editing your theme without coding. However, it’s important to note that these plugins may also have limitations and may not work with all themes.
Another option is to hire a professional web designer or developer who can make customizations for you. This can be a good solution if you have specific design requirements or if you’re not comfortable making changes yourself.
Why can’t I edit my theme in WordPress?
There could be several reasons why you are unable to edit your theme in WordPress:
1. You don’t have the proper permissions: If you are not the site owner or do not have administrator privileges, you may not be able to edit themes.
2. Outdated theme: If your theme is outdated and no longer supported by WordPress, it may not allow for editing.
3. Locked by a plugin: Some plugins may lock certain theme settings, preventing you from making changes. Try deactivating your plugins and see if that resolves the issue.
If you enjoyed this article check our other guides:
